By: Bryan Blazek – Date Posted: January 20, 2011
If you are like me, your winters are spent analyzing the previous season, preparing new angles of attack for the spring thaw, and examining and repairing your gear. For my first in a series of articles on ‘Down Time’, I will be discussing basic rod and reel maintenance; focusing on tear down and lubrication of a baitcasting reel. I have come to realize that all too many fishermen I speak with either do not perform any maintenance on their equipment, or send it to someone else for service. Fishing reels are precision machinery, (some more precision than others) and proper maintenance and cleaning will extend the life of the product, as well as insure that all components of the reel function properly. That being said, these are not computers or Swiss watches; fishing reels can be taken apart and serviced with tools commonly found in your household. What it really comes down to is taking some pride in your equipment, and enjoying the quality of a well maintained setup.
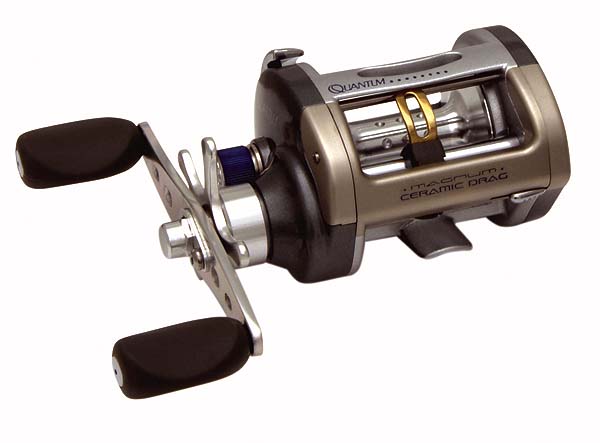
Today we will look at a setup of mine that gets a lot of use, a Cabela’s Prodigy med. action casting rod paired with a Tournament ZX reel. Now I realize this isn’t a top of the line reel to show maintenance on, however, the steps are about the same no matter what brand or type of reel you are using. Having a good diagram of your reel is nice for identifying parts needed for replacement, or helping with re-assembly, should you mix up your order. The other thing I wanted to point out is that these lower cost reels tend to have looser tolerances inside on the gearing, and there is more room for junk to build up in there, inhibiting smooth action. I don’t know about you, but I dig smooth action. That’s why I take down my reels a couple times a year for a thorough cleaning and lubrication.
First we need to gather our supplies. The only thing you may need to purchase for this task is quality gear lubricant and oil. I happen to restore vintage road bicycles in my garage, so I have become comfortable with a particular tube of synthetic lubricant, and usually use either Abu brand gear oil, or have cheated with some chain lube before. The key to lubricants is keeping corrosion off of tiny internal gears and bearings, and keeping them spinning smoothly. Baitcasters that have developed an annoying buzz when casting can often be revitalized to like new condition my a thorough clean and lube. So enough already… here we go.
First we need a reel:
Next, gather supplies. You will need a #1 phillips screwdiver, a techie screwdriver, a 10mm wrench (usually), a couple rags, a toothbrush, a can of WD-40 for cleaning, and a pair of long forceps or tweezers.
So, the first thing we need to do is begin to disassemble the crank side of the reel. I prefer to do this with the spool still in the reel, but these tasks could be interchanged. The first thing you should do is remove the small Phillips screw on the handle, holding the bolt lock/cover on the main bolt. Once removed, you should have access to the 10mm bolt behind. Do yourself a favor at this point, use a proper wrench at this point, and not pliers like a little kid. Pliers mar the surface and make it look like junk, wrenches will give you professional results. Loosen the main bolt and remove the handle.
Next we will need to begin to disassemble the crank assembly. Take caution, and be very meticulous on how you approach this. Take every part off with the same motion, and lay each part in order of how it was removed. Being meticulously organized will save you a headache later. After unscrewing the drag, you will see an assortment of washers and spacers, as well as the clicker for the drag. Be very careful to keep these in the same order by stacking them on your workbench.
At this point you should have a small assortment of parts layed out looking something like this. Continue to repeat this process for everything you take apart, and it will be easy to put back together.
The next step will be to remove the spool. A small peice of tape is nice to keep your line on the spool if you are going to reuse it. First we need to remove the side cover. This reel has a button to push as you twist the side plate. My Abu reels have a screw you need to loosen instead of a button, and Shimano uses various designs. Sometimes this can be tricky to figure out, but it is usually some combination of taking something off and twisting the cover.
Then you will see the barking system exposed.
Next, get a firm hold of the pin in the center of the spool and pull it out. I usually disengage the spool to do this, however I am not sure it is completely necessary.
Take a look down in there and you see the gears, as well as dirt and sand that has worked it’s way down into the reel.
Next you need to remove all screws securing the cover on the crank side of the reel. There are usually hidden screws securing the cover to the frame from the inside of the spool side, as can be seen in the above image.
Inside the cover you will find two bearings that need to be removed,one is the roller bearing, the other is for the cast brake control. Clean these with your toothbrush and WD-40, and lube them. Clean the entire inside of this cover thoroughly (note more sand) I wash this under the faucet.
Remove the brake controller by unscrewing, there is usually a small washer in there, BE CAREFUL not to lose anything in here, clean and lube as above.
Next looking down at the gears, you will notice some springs. These need to be carefully removed with your tweezers, cleaned and greased.
Next we need to remove the drag washers. Pay attention to what direction the washers face, as one side of the steel washer is usually polished to act a specific friction on the drag washer.
Now we should have another cache of parts layed out.
We are now fully dis-assembled to the point where we can start cleaning. Use your toothbrush and rag to remove any old grease from the gears. Clean the entire frame and all surfaces with a cloth to remove gunk and grime. Pay careful attention to spots under gears, under the thumb bar disengagement, and the gearing on the levelwind. Your WD-40 can be used to blast grime and sand from bearings and parts, I usually carry them over to the sink and blast away. Be careful to then clean residue away before re-assembly and final lubrication. A general rule of thumb is: grease the gears, oil the bearings.
The only place we want to keep clear of grease and oil is the spool and drag assembly. Clean the drag assembly and washers with alcohol to remove any grease you may have accidentally gotten in there during lubrication.
The next few pictures highlight areas that need to be lubricated and cleaned.
Now comes the hardest part. Once you are satisfied with your level of cleaning and lubrication, it is time to re-assemble your reel. This is where you are patting yourself on the back for being so organized when you took it apart. First, get the drag washers back in place, then the springs. Slide the bearings back into the cover, and reassemble the brake control. Slide the cover back into place, and fasten with all screws in correct locations. Now wipe the shaft of the spool clean, and put the spool back in its place. At this point you should be able to turn the spool with the crank shaft, ensuring clean engagement and spinning of the gears. If everything turns fine, reattach the side cover with the brake. You should now be looking at a reel with no crank. Go backwards through your pre-arranged pile of parts to correctly assemble the crank. Torque down the bolt with your wrench and put the lock back on the bolt, and you’re done! Once you have your reel assembled, spin it like you would test it new. Check for any loose parts, or things leftover on your toolbench. If everything is working properly, turn your attention to your rod.
I use Windex to clean my fishing rods. I find it to work great at removing dirt and grease from the rod guides, the rod, as well as both cork and foam handles. Usually for an exceptionally dirty cork handle I will use a hot cloth when scrubbing it. Check your line guides to make sure they are all aligned properly, and check the condition of the inserts. A loose line guide insert can be easily repaired with a clear epoxy.
Hopefully during your own down time, you will have an opportunity to do some maintenance of your own. Working on your own stuff makes you feel really good when you make it out on the water and feel the results of the work you put in. Also, by knowing how your stuff works, you can fix it yourself, and save some money- better spent on hunks of metal and plastic to lose in the river. Stay tuned for another segment coming up as soon as my latest Tackle Warehouse order shows up. Tight lines ices guys!